Don't know if anyone has tried this already, but thought I'd share it anyway.
I've never really cared for the way some craftspeople/artists fasten their tops to the pedestals when doing rustic tables. Most of the time, a separate piece of plywood or scrap wood is fastened to the pedestal with the tabletop then fastened to the separate piece with screws. This method, while effective in most situations, just doesn't aesthetically appeal to me that much. So, I tried something different and am very pleased with the results.
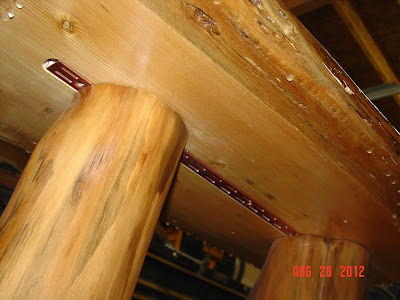
All you need, really is a shelf bracket easily purchased at your local hardware store. The bracket should be a "double" bracket for strength (see picture below). When fastened to the legs of the pedestal with 2-3" deck screws, you can literally pick your piece up off the floor by the bracket. That's how strong this is. In this photo you can see two of the deck screws I used (the other two are hidden by one side of the bracket).
The next step is to rout out a "slot" to accommodate the bracket on the underside of the tabletop. This is probably the most difficult part of the operation, but isn't all that hard, really. I found using another shelf bracket as my guide (first one side of the slot and then the other) works beautifully. A 3/4" straight bit set at the same depth as the thickness of the shelf bracket is all there is to it. Oh, another thing I found that helps is to predrill a hole with a forstner bit to accommodate the router bit (unless you prefer to use a plunge router).
If all goes well with that step, the routed slot should be just right - just like the baby bear's porridge.
Add deck screws (three in this project) underneath to attach the top to the pedestal, and voila -- you have a very stable, strong, and hardly visible, almost hidden attachment for the tabletop on the pedestal. If you look closely at the photo above, you can see one of the pre-drilled holes almost on the end of this bracket (there are three in this bracket - one on each end and one in the center of the bracket). From underneath, all you have to do to attach the top to the bracket is screw a deck screw into each hole. It'll snug up the top to the bracket, and will hold it very securely.
I also thought I'd give epoxy/resin another try on a larger surface. This was the one. Needs another coat, but I'm getting better at this every time I use it. Still have a long way to go, but getting there.
Sunday, August 26, 2012
Sunday, August 12, 2012
Doing some damage!
Experimenting with a process can be so much fun. Thinking that pine cones might look really nice for Christmas decorations if they were varnished, some kind of a "drying" jig had to be made. We've also been varnishing aspen leaves to use as appliques on some of the pieces we're making and then coating with epoxy resin.
The picture below is of the jig with pine cones dipped in spar varnish drying.
Deck screws drilled into the bottom of each pine cone provide a very nice handle of sorts for both dipping and hanging from the jig. Bungee cords and clothespins complete the process.
The next photo is of both pine cones and aspen leaves drying at the same time. After the first try it became pretty clear the pine cones didn't require hanging like the leaves, but they did require some kind of pan to dry in. That's where the disposable paint roller pan came in. It actually serves a dual purpose for drips from the hanging leaves and a catch pan for excess varnish coming off the pine cones. Both the leaves and pine cones were finished using a water based polyurethane this time. The hope is this varnish will work as well as the spar because it isn't nearly as toxic (especially the smell).
The final photo below is of the finished pine cones that were done in spar varnish. The results are very satisfactory, but, again, the hope is that the water based works just as well. Will let everyone know when they've thoroughly cured.
Subscribe to:
Posts (Atom)


