Friday, September 20, 2013

In the "no sympathy for stupidity" department

Awhile back, my teddy bear of a Father-In-Law told me something that's stayed with me ever since that one time when I clocked myself up alongside the head with a lawn rake that hadn't been put away property and I stepped on the teeth; "there's no sympathy for stupidity"! Boy, was he right!

Three years ago, I cut up a bunch of cottonwood rounds into slabs I hoped might make some nice tabletops at some point. Yesterday, when Katherine looked at the cottonwood slabs I'd been working on for the television stand, neither one really appealed to her. They just didn't seem right for the application.

So, I went into the back 40 (actually the back 4 or 5) to the cottonwood wood pile and saw some slabs that might work if I split them using a wedge and a sledge hammer. The first photo is of one of those slabs. Nice grain, nice shape, waaaay too big. Yep, gotta split it.


Put wedge in an existing crack, and started hammering away at it. Problem is, the wedge wasn't really a wedge in the truest sense of the word. It was actually an old maul head the handle had broken off of years before.

My thinking, however flawed (or stupid, if you prefer), was this would make a really good wedge. It's shaped right, very heavy, and made to hammer stuff, right?

Wrong! In the photo below, you can see one of the areas that chipped out of the hammerhead when I struck it with my sledge. The little piece beside the hammerhead is the piece that went into my knee like a bullet shot out of a gun.


I won't bore you with a photo of the actual wound, but it wasn't enough to make me feint (do so at the sight of my own blood most of the time). Walking back to the house wasn't even a problem.

The photo below shows some of the blood, but also shows the hole in my jeans where the piece went through them.


Thank you, Katherine, for taking such good care of me. I am going to go back up to the shop today at some point and start planing down those slabs to usable thicknesses. I promise to be more careful!

Lesson(s) learned:

1.) Put on those damn chainsaw chaps - that's what they're for, you dummy! Ya shoulda learned the first time you put that chainsaw across your other knee!

And,

2.) Use a real wedge designed and made for that specific purpose, you dummy!


Wednesday, September 18, 2013

Television Stand - Part Cinq: Major Change of Plan

Well, this is what I get for charging full steam ahead with good intentions to make a television stand using walnut slabs - they're too nice to be covered up by a TV and accompanying equipment.

Got the under part of the pedestal all leveled off.


Got the walnut slabs planed down to the thickness I wanted and the whole thing to the height we needed.


Set it up in the shop just balancing the slabs to see how it might look when finished (they'd actually be moved over some to the right in this picture to balance out everything and make maximum use of as much of the slab as possible). Looking really good, right? That's when Katherine and I decided together those dang walnut slabs are just too pretty to be covered up.


Decisions, decisions. What to do? What to do? Don't have any other pine slabs to use, but do have a whole lot of cottonwood slabs that have been curing in the barn now for three years. But they're way too big for something like this.

Well, they're way too big if used as one piece. The one in the back of the photo below is about 4' high by almost 3' wide. What if I split the dang thing right down the middle? Tried it using a sledge hammer and driving a wedge down into the grain from the end and got two really nice slabs about the same width.

Problem was they were each about 6" to 7" thick depending on how bad a job of chainsawing I did when cutting the slab originally. The depth desired is 2 3/4" to 3" thick. Back to the router planer.


Because these slabs are 4' in length, it's necessary that I set up the "big boy" router planer and use the 15' long rails to support the router sled. The height adjustment here is a little more dicey than on the other set up I use, but once set, it's really easy to use.


First pass and you can see the sawdust this generates.


I made it a habit to use a leaf blower after each pass is finished to not only keep the work area cleaner, but also to be able to see the work done to that point.


Next step was to make absolutely sure depth of cut didn't take the slab thickness down to below 2 3/4". Perfect!


It was about this time when I began to realize the sawdust generated by multiple, multiple passes of the router was going to be excessive to say the least. Brain fart told me to remember some of the photos I've seen of projects on one of my favorite woodworking websites ever, LumberJocks.com, in which sawdust is used to enhance the photos, and I began saving the shavings.


At this point, I also wanted to see what the planed slab of cottonwood might look like when mounted on the pedestal, so I spread some of the sawdust on the work platform by my shop, brought the pedestal out, and set the slab on top. I'm not so sure I want to use the cottonwood for this application either after seeing how pretty it looks as a tabletop (just kidding).


Bottom line - cottonwood is a very misunderstood, maligned wood that has a beautiful grain (especially in branch crotches), but is really stinky to work with.


And, I do mean STINKY!

Thursday, September 5, 2013

Television Stand - Part Quatre.....Beginning to take shape

I think it's starting to actually look somewhat like a stand of some sort. Still a lot of tweaking to do, but getting there.

After the last post, it was time to "set it up"....well, sort of.

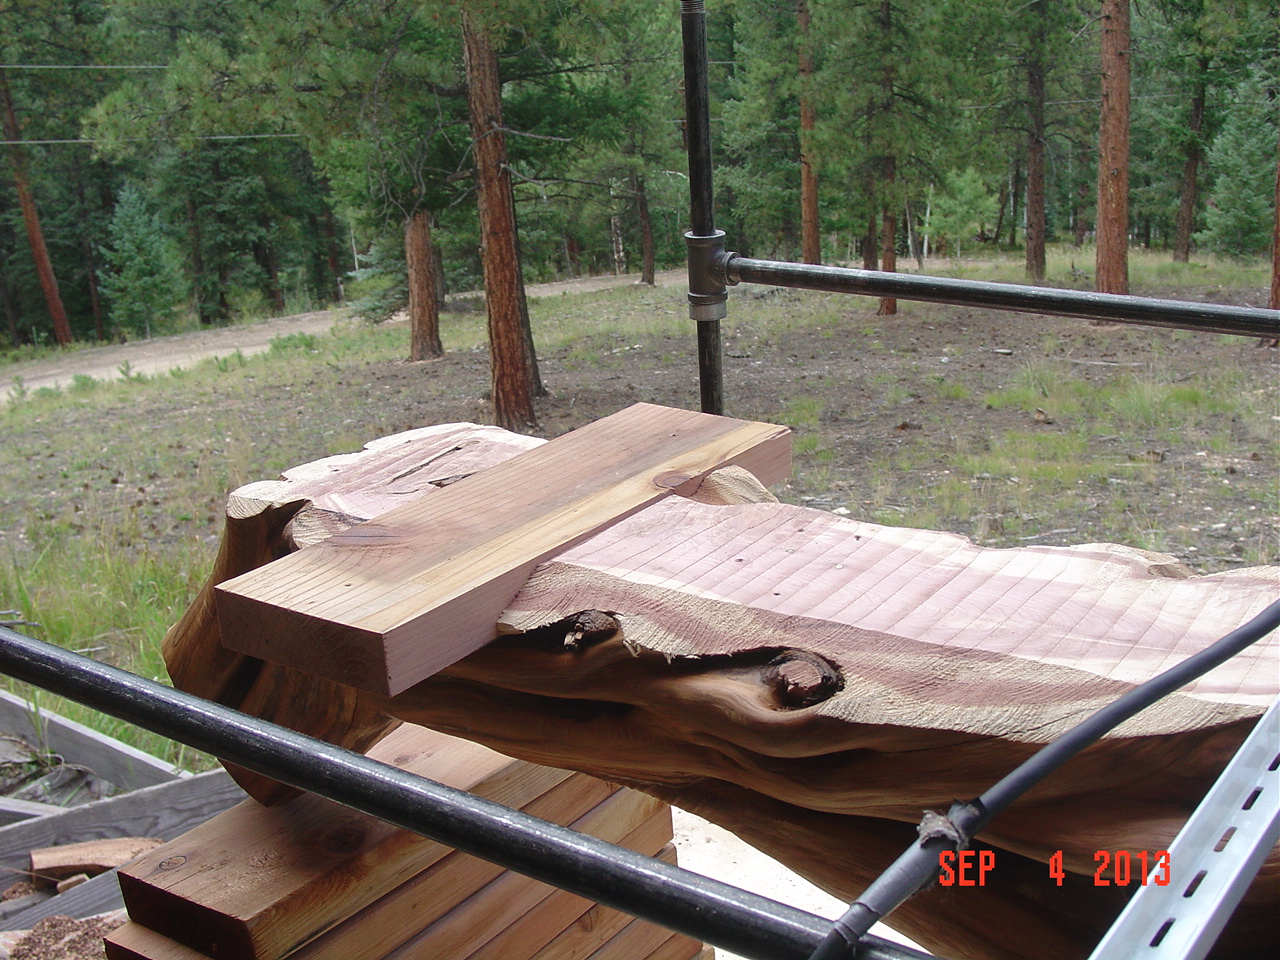
Still wasn't sure at this point what kind of base to set this whole thing on when done, so router planed another slab of walnut to see how it might look. Also, found a piece of scrap juniper laying around to use as the "spacer" between the two shelves to try to get an idea of how high this thing was going to stand.

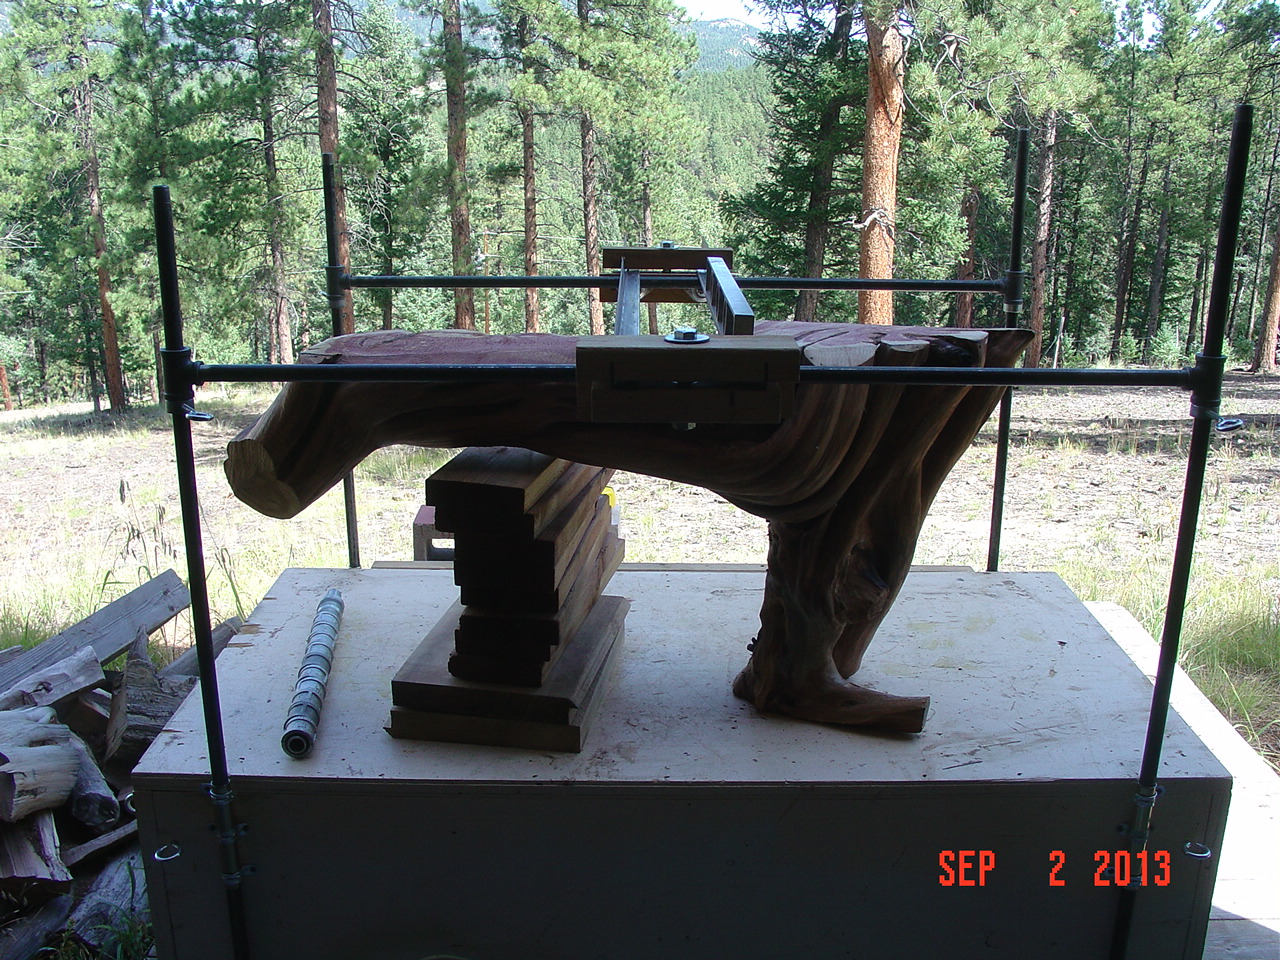
Front and back photos below (you get to decide for yourselves which is actually front and back).

The problem: way too high (38" - want it to be about 30" when finished) and didn't like the slab underneath the whole thing at all - made it look way too bulky.


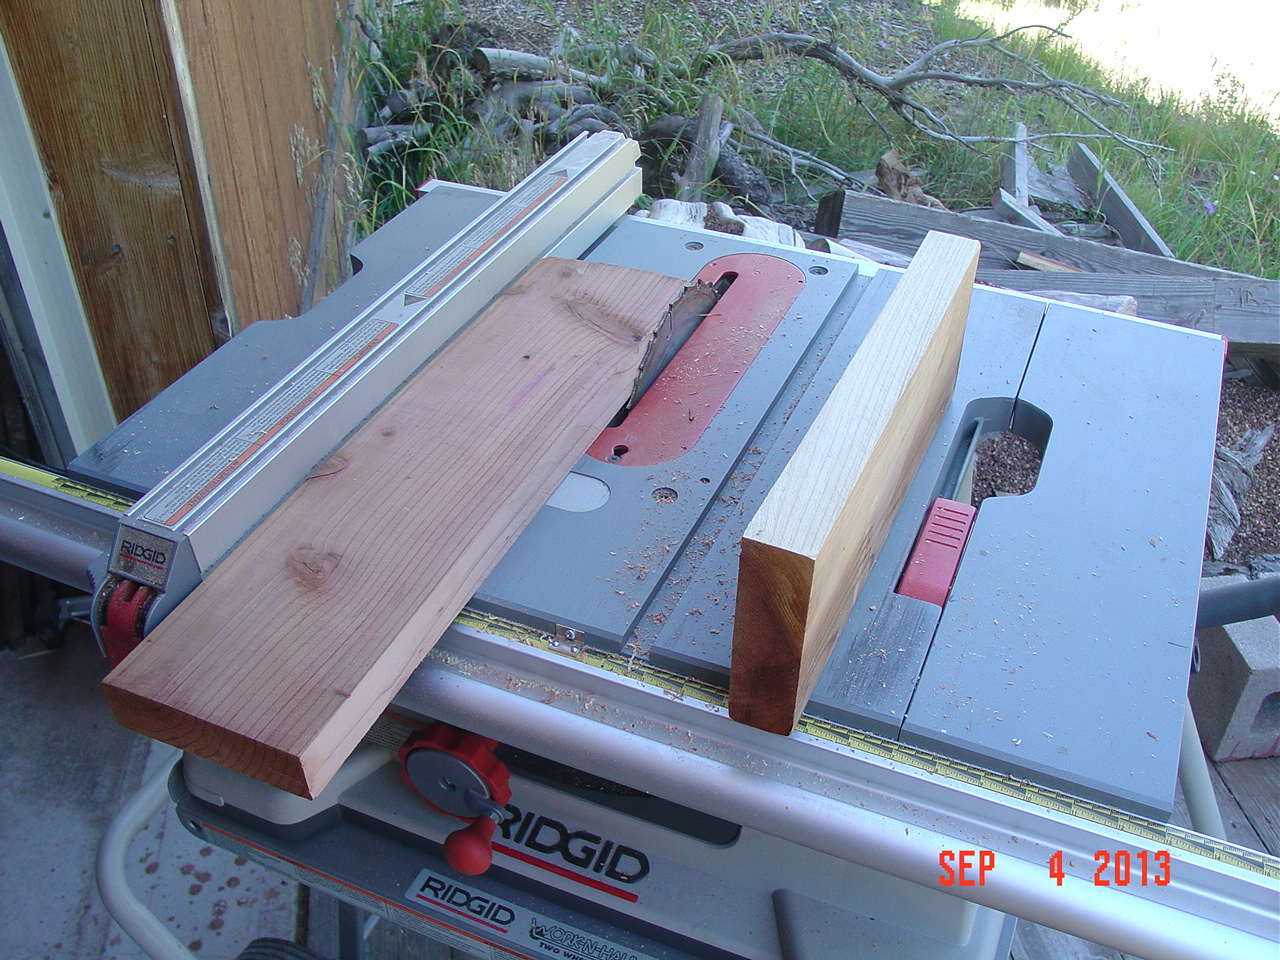
So, back to the old drawing board. Because the slab underneath it all was too bulky, I decided to see how some crosspieces might work as stabilizers. Some scrap pieces of 2x6 cedar came in really handy for this part because they were long enough, square enough, and "red" enough to blend in with the foundation. At least that's the hope. I'll also be doing some sculpting to help them blend even a little bit more before starting the finishing process.

Laid it all out (photo below), and decided if this was the way to go, the cross pieces needed to be cut on the table saw to get them to a uniform width and thickness.


Once that was done, I realized they'd also need to be dado-ed into the bottom of the foundation piece. Otherwise, nothing was really gained by not using the slab concept.

This was the trickiest part of the process as far as I'm concerned. Getting everything set up to do the dadoes was time consuming because everything had to be on the level, and "guides" needed to be set up to keep the cuts very straight.

My first attempt at guides was to use a couple of pieces of scrap screwed into the bottom of the piece itself.


Still way too wobbly for my satisfaction. Looked around the shop for something else a little longer, and came up with a couple of shelf supports that I just screwed into the bottom. Had to make sure they were equidistant all the way along the cut, but these were VERY stable, and allowed repeated clean cuts to just the right depth.


When all was said and done, the crosspieces fit very snugly into the dadoes. They'll still get deck screws into the bottom to hold them even more securely, but that's just me....overkill.


Don't know if you can see it or not, but the crosspieces were still a little "proud" in the photo above. This required one more pass of the router planer to get them flush with the piece, itself (photo below). That's just another of the many reasons I really like this router planer setup - it allows for multiple, micro-adjusted cuts to get the right surface, no matter what and no matter the height of the piece itself up to 48".


Perfect! The only thing left on this part of the process is to sculpt the crosspieces a little so they actually blend into the overall "theme" of the stand - maybe in the next post......


The next step was to find a piece of juniper to serve as the spacer in between the two shelves. The first spacer I used for demonstration purposes was just too plain, and didn't speak to me at all. So, I went looking amongst my raw materials piles, and the piece below is the result. In order to secure this piece for planing both top and bottom, it had to be attached to a 2x6 first, and then the 2x6 had to be attached to the work surface, all by using deck screws. Otherwise, the first pass with the router would have sent this thing flying who knows where?


Made three passes with the router, and got it down to about 13" high. Didn't want to go too far on this side. Again, you can take stuff off, but once it's off it can't be put back.


Next step was to remove all the screws and re-secure the whole thing using the same process, but by flipping it upside down.

Took two passes to get it down to a height of 12" which was about all I wanted to take off at this point.


Once again, it's time to remove all the screws and see what this baby looks like set up sans connectors (hopefully, it won't fall over).


Wow, balances pretty well, I'd say! And, it's looking more and more like the TV stand it's supposed to be when done. Now I just need to see how high it stands.


Oops! It's still almost 8" too high at this point. Now it all boils down to whether to take all the extra from just one of the pedestal pieces or split the difference and take some from each in order to get down to the 30" height we want.

What do you think we should do?

Monday, September 2, 2013

Television Stand - Part Trois

Left off on my last post with sorta flattening the bottom of what will become the main pedestal for the unit by grinding it down and eye-balling it. Still not very good at that, so decided I'm going to have to plane it down using the router planer.

This is a really big piece, and it needed some work before planing, though. First of all, it sat kind of catty wompus after my eye-balling debacle:

Next step was to shim it up so it would at least balance for me to scribe a line all the way around the base. That really wasn't too difficult as all I needed to do was tilt it a little bit and put a block of wood underneath it to get the majority of the pedestal vertical (second, third, and fourth photos below). In the last photo, you can see how I used a black magic marker to scribe a line all the way around the base to be used as a guide when routing it down to level.

 
The scribe line shows just how badly my eye-balling effort was. There's basically about four inches of a conical shape that had to be hogged off in order for it to be level.


To get better balance while planing, I decided to cut off part of the main pedestal first. That way, I could tip the whole thing upside down and work on it with little to no movement or even fear of movement as the router was run back and forth over the piece.

Now comes the fun part - setting up the planer, balancing the piece so it won't fall over during routing, and trying to get it as level as possible for the operation.

To start, I had to replace the shorter end pipes with 48" pipes to accommodate the height of the piece. Next step was to approximate the height of the rails so the planer would pass over the piece while still allowing the depth of the router to take some of the stock off in each pass.

 Balancing was accomplished by building up a stack of 2x6 pieces of scrap with the very last one being a piece only 3/4" thick. Voila! This thing balanced like a charm.

Got the final fine tuning done on the height adjustment and made the first three passes (only 1/4" or less per pass so as to minimize the possibility of taking too much off.....can take a bunch off, but can't put it back if too much goes).

Cut once but measure and check level at least twice before moving on to the next depth of cut adjustment in the router. Pretty level, but have to set the rails a little lower now.

You can see in the photo below, there's about 3/4" between the runner of the sled and the piece itself. Depth of cut is only 3/4" on this router, so had to once again fine tune the height adjustment of the rails.

Once all that was done, and I'd made what seemed like a hundred passes, the whole bottom was finally even.

Put the level on it, and you can see in the photo below, it's still off slightly but not all that much or that bad.

So, I flipped the whole thing over and it sat really nice and flat for the final routing on the top of the piece.


A few quick passes with the router (this was a breeze simply because it is much smaller than the bottom of the piece), and the level shows an almost perfect flat top on which to place the lower of the two shelves to come.


Thursday, August 29, 2013

Television Stand - Part Deux...

Well, doggone it....finally decided to dedicate more time to this project and git er done! Figured I needed to be able to hog off some of the router marks left in the slabs after planing, and bought this heavy duty, magnesium 4"x24" belt sander from Harbor Freight. Suffice to say, it works (2nd photo).


Some of the gouges were also from my chainsaw. Those were a little hairier to get out, and the sander got shelved for that process. Instead, I used a 4 1/2" cup rasp wheel, also from Harbor Freight, that I was pretty impressed with (see previous post of my tool review on this product.

Anyway, I roughed each slab as flat as my eye could see - eyeballing isn't something I'm really too good at, but it got the job done.....Oooh, my aching back!

This is a lot harder than I thought it would be. I had to keep raising the slab up so my 6'4" frame wouldn't have to keep bending over so far. Even at that, the reach across the piece was far enough that the main pressure point was right square in the middle of my low back, and now I'm sitting here typing with a heat pack on and thinking about pouring a nice tall glass of wine to help drown my sorrows and to numb the pain.

The next step was a little more complicated. A lot of the finished appeal of a piece like this is in the actual arrangement of the separate components. Everyone has their own ideas on how things should ultimately look, and I knew what I thought was right might not be the same thing as what Katherine thought. So, I asked her to come on up to the shop and take a look-see and provide some feedback.

Before she came up, though, I "arranged" the components how I thought they might look best:


Try to imagine the pieces in this photo without the concrete blocks in between the shelves and with the shelves attached to the two end columns. I thought that would be pretty appealing.

Katherine took one look and told me to get the column on the right out of there. Then she turned the other column piece completely upside down to try to take advantage of the twist in this piece of juniper.


I know the lighting isn't too good on the first photo above, but hopefully you get the idea.

The shelves will look almost like they are suspended when attached. I'll be cutting the top part of the anchor column off and leveling it to accommodate the lower shelf that'll be home to the electronic components like DVD player and sound bar. That's a whole nother process for the next blog post on this project.

Getting the bottom of the anchor post flat was achieved by using the angle grinder with the cup rasp wheel. Took awhile, again, simply because my eyeballing skills need to be honed a whole lot more before I'll consider them to be even close to kind of good.


This piece is so heavy, all I had to do to stabilize it while grinding was to lean it up against my sawhorses. It didn't move at all!

The end result (I still have a little more work to do on the bottom to get the angle it sits at just right, but I'm getting pretty close) should be a very stable, anchor column for the two very heavy shelves.

The lower shelf will be about where you see the branch sticking out from the trunk about 2/3 of the way up in the photo below, and the top shelf just attached to the spacer column in between the two shelves (pictures to come in the next blog post).

I sure do hope my idea is a good one when this all gets put together. Balance and stability are key elements, and I'm just not sure yet whether I have both in what I'm doing so far. Guess the proof will be in the pudding as a wise old man (my Dad) once told me.