Monday, August 29, 2016

Starting Over - Part 4: SIDETRACKED!

It had to happen sooner or later....getting sidetracked, that is.

Some time ago, I had the tools to do the work. Then came the realization the work could probably get done with other, smaller, less efficient tools. So, some of the bigger tools got sold.

Then came the realization that those smaller, less efficient tools needed work in order to work, and that's where the "sidetrack" came into being.

The reluctance to do so, however, was overwhelming. In other words, I had to at least try my circular saw, table saw, and even a two inch router bit with top guide for edging before accepting they weren't going to do the job adequately or to my satisfaction and doing what I knew ultimately needed to be done anyway. Well, as anticipated, none of them got the sides smooth or true enough to be able to joint these planks together. Simple as that.

So, sidetrack onto a tool gloat, or so I thought, of a Wright model jointer/planer vintage 1940's.


Problem is the tool was minus cutter knives that can't be replaced because the company is out of business. That one is going on the scrap metal heap and will be unceremoniously "retired" by the scrap metal guy when he comes for some other metal scraps. Hate to see this antique have to go this route, but truth is I couldn't even give it away. Oh, well....

Enter a little 4" Sears Craftsman jointer/planer daughter Jessi snagged from somewhere awhile ago.
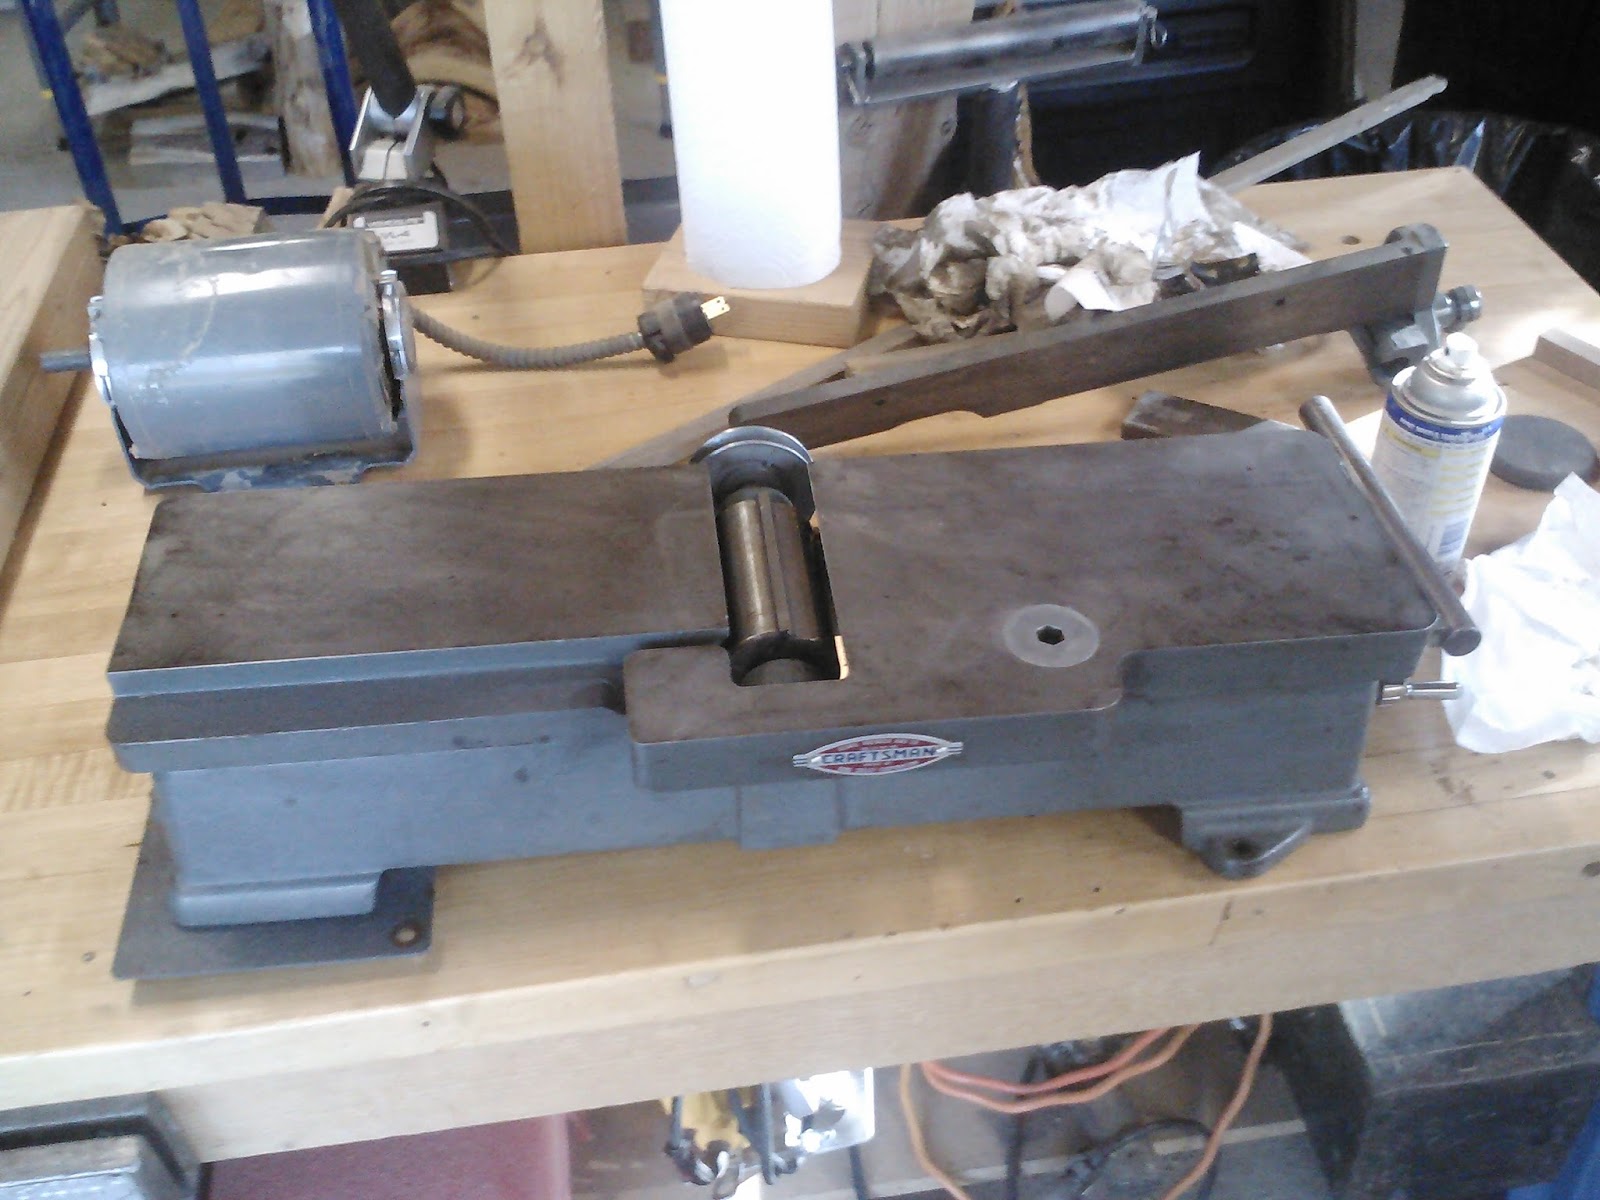


Rust removal, clean-up underneath, and it was ready to go....except for the fact it had to be fastened to something solid and heavy to keep it steady.

Enter the stand from the Wright jointer/planer -- you know, the one that couldn't be used because it had no cutter knives? Yup...that jointer/planer had a stand that, with a little adaptation and ingenuity, could accommodate the smaller Sears Craftsman planer.


Here's how it got done:

Build a frame to support the tool....scraps sure do come in handy every once in awhile.


Align the frame in order to be able to attach it to the stand so the drive belt is open and accessible.


Fit the frame down over the stand and attach it.


Hinge a couple of pieces together to make a kind of free floating motor stand that will allow the electric motor's weight, when mounted, to take any and all slack out of the drive belt to run the jointer/planer.


Set the motor under the jointer/planer and make sure the drive belt aligns perpendicular.


Clamp the hinged motor stand to the stationary stand and try it out by plugging it in and keeping fingers crossed it won't burn up in the process.


Well, after a "pucker factor increase" wondering if this whole thing is going to work or not, I was very pleasantly surprised....it did! And pretty durn burn well if I do say so myself!

The learning curve on using this thing with those size planks was a long one, though. It took quite a few passes to understand better how to run them through for best results.

Bottom line is even though the sidetrack took a few days to set up, the results were well worth the effort, something I should have known they would be right from the get go, but was just too damn stubborn to admit.

One other thing....give a huge shout out to friend and fellow woodworker, Mike Barrett for letting me use his thickness planer.

That tool made short work of planing the tops and bottoms of the planks mentioned in the previous blog post down to a uniform thickness for the tabletop.

The reason the thickness planer was needed was because I'd sold mine thinking the router planer would suffice. Problem is it cupped every..single..plank in the middle because of the weight of the router and the sled not being quite rigid enough to not allow that to happen (yeah, I know this photo is one I've used before, but it was the best one to help illustrate the problem).


Add to that the fact the table saw blade at its highest point (yeah, I was too stubborn at that point to call Mike and tried this last resort before finally swallowing my pride) still wasn't high enough to true up the tops or bottoms of those planks when they were turned on their sides, and it became a perfect storm of frustration and turning the air blue as a result!

Enter the MAN --- Mike Barrett!

Sorry....no photos of this part of the project. Suffice to say the entire operation went "smoothly" and "uniformly".

Next up? Glue-up....


Tuesday, August 16, 2016

Starting Over - Part 3: Router Planing

The log shown below was one I didn't want to take a chance on ruining with my lack of chainsaw slabbing skills, so a decision was made to router plane it down to thickness....2" was the goal. But first, it had to be leveled on one "side", flipped over and leveled on the other side, and flipped over repeatedly to get to the desired 2" slab thickness.

Given the fact I ruined two slabs with the chainsaw, using this log became necessary. Originally it was going to be an old-timer fireplace mantel, but what the heck, eh? 


Slow work flipping it over and over and over, but this is the only way I have available to do this work. Hmmmmm....might a thickness planer work for this kind of job? Yup, but when I sold my brand new, perfectly good Ridgid 13" thickness planer, that option pretty much flew out the window (or drove off in the pickup of the person who bought it from me). Sometimes I gotta wonder about my own thought process....or lack thereof! Live and learn.


DAMN, but routing something this big in diameter down to thickness creates a LOT of sawdust, and this pile is just the beginning of what ultimately became kind of a "mini-mountain" of sawdust outside my shop door as I had to rake it out in order to be able to close the sliding barn door!


The log is 51" long and the router bit is a 3/4" straight bit that has to be moved crosswise back and forth, back and forth, back and forth until the end of the log is reached. Then it's back it up and start all over again to a depth of cut right around 1/2" each time (deeper than that is waaaaaay too hard on the router even though it a 2 3/4 hp beast....repetition like this will burn it out faster than using it for its intended purpose would for sure). Doesn't take a mathematical genius to figure out how long each pass takes when confronted with the numbers.


Boy, but this is taking a looooooong time! That horizontal mark is a little bit OVER the thickness I need (gotta leave some wiggle room).


Four down and one to go to get the desired 5 log width of juniper.


Still not sure about the final design, though. My first inclination was to leave all the live natural edges and "fit" the slabs together for a more rough cut look. That option didn't appear to be viable timewise for this project, though. So, each slab got a flat side using a circular saw. After that, the slab got run through the table saw with the flat edge up against the fence (a radial arm saw would have worked much, much better for this step, but I sold that, too....starting to detect a pattern here?).

After they'd all been run through the table saw, another decision had to be made....should douglas fir spacers be put in between each of the slabs as shown below and cut to the same thickness? Or should the juniper slabs be glued together and have two douglas fir edge slabs? Not to worry....plenty of time to decide. This isn't a command decision that has to be made immediately. Lots of other work to be done in the interim.


With the fifth juniper slab router planed to thickness, even though I didn't want to make a decision on the douglas fir immediately that's what I did....two edge slabs, and, yes, I did cut this log in half with the chainsaw, and, yes, you saw the photo in my last blog post, and, yes, the photo makes the cut look a whole lot better than it actually was. That being said, looks didn't matter....functionality did, and these were both very functional after they were planed to thickness.


Finally! All the slabs are router planed down and ready to be glued up!


Well, not really....first they need to be edge planed so the joints are nice and flush and smooth. That's what's up next.


Monday, August 15, 2016

Starting Over - Part 2: Slabbing With a Chainsaw (I still suck at it)

It was inevitable, I guess. Being sans a sawmill and not having it in the budget to take the logs for the replacement tabletop to Scott so he could mill them, I had to face the task of slabbing those logs with my chainsaw....something I ain't all that good at....never have been and probably never will be!

By now it should be a snap given all the experience I've had, but nooooo! I'm not even going to show the slabbing work in progress! No sirree! Suffice to say, my sorry attempt resulted in two usable logs becoming totally unusable logs! Oh, well.

The three slabs you see in the two photos below, while not exactly what I'd hoped for in cutting the center out of the log, were at least not going on the scrap pile.

The little Homelite chainsaw I started the job with might not be so lucky, though. I thought this littler saw might be easier on my back and easier to handle. It was. I also thought this job might be an overreach of its capability. It was.

Reality is the Homelite may not be cut out for this kind of work....ripping instead of crosscutting logs. It got so hot, it died out and wouldn't restart, and I haven't tried to coax it back to life since then.


When it came to slabbing the two outer edges for the table, the perfect log just happened to be an old Douglas Fir that would provide both side slabs if it was cut right down the center of the log....that is, if the chainsaw worked the way it was supposed to! That's a joke...ha, ha...get it? If, and that's a very big if, the chainsaw worked the way it was supposed to? That's right! Put the responsibility right square where it belongs.....on the CHAINSAW!

That log toward the back of the photo? That's the one referenced above. It's about 12-13" in diameter, so should yield two nice slabs if I do this right.


Well, it kinda sorta worked the way it was supposed to. The photo makes the job look a whole lot better than it actually is. 


Now it remains to put it all together and hope there's gonna be enough material to do the job.

Next up....router planing in earnest!


Wednesday, July 27, 2016

Starting Over ---- Part 1

The writing bug hadn't hit for awhile because of the last debacle with aspen that I finally had to simply give up on finishing and refund the client's down payment. The reason the writing bug has finally making a kind of sort of a comeback is because of another debacle I engaged in awhile back. The end product of that debacle was a small conference table I was pretty doggone proud of if I do say so myself. Dang thing even made it into the Daily Top 3 on one of my favorite web sites called Lumberjocks.

This is what it looked like pre-delivery:


Thing is, after the table was delivered and set up in its permanent location, it began to split. I ain't talking a little split either.


Eventually it split right down the middle of the tabletop, itself.


The reason? Well, those end pieces? Those breadboard ends? They certainly looked nice, but they expanded and contracted lengthwise which was crosswise with the rest of the table which, as anyone with half a brain can figure out, wasn't good. No....not at all!

Make no mistake ---- this one was all on me! This was my bad, my lack of knowledge about how to make breadboard ends and of how wood, especially wood that's placed at right angles to other pieces of wood in the piece, interact when glued up and put under stress. What I should have done, and the key word here is "should", is glue one dowel very tightly in the center with the rest of the dowels going into more oblong openings with no glue in order to allow for that expansion and contraction. But I didn't do that and here we are....

The cracks were so bad, there was no salvaging the top, so back to the drawing board and coming up with a new tabletop that will be as striking a design as the original, but without putting in those durn burn breadboard ends.

So, this new series is going to document the process in coming up with a new design that will hopefully satisfy the client. In the meantime, he was given a hand carved juniper bowl as a sort of a peace offering for his patience and understanding in this my second debacle!

The first issue in doing another tabletop was finding enough additional juniper to actually be able to do another tabletop. This is all I had (except for some really big pieces already earmarked for fireplace mantels and table pedestals):


Now that may look like it'll be enough, but the photo is deceiving. Those logs are only 50" long. Diameter is also an issue because juniper is notorious for a significant taper which makes it difficult to get logs that even come close to being a consistent diameter for this kind of project. Oh, well....

Alternating the logs lengthwise in opposite directions might be a possible answer to the narrow taper issue.

Line em' up, measure across (gotta be a total of 36" in there somewhere). I think this many might just do the trick. Time will tell.


So, clean the bark off, line them up again just to make sure:


Thing is, this time around the plan is to use only juniper instead of incorporating cottonwood into the center part of the tabletop. Being the suspicious individual I am, there's a conspiracy theory in the back of my mind that says the cottonwood may have been part of the problem to begin with because it probably hadn't had enough time to cure completely before use. If that's the case, then drying while on display in the final location isn't probably the best course of action, eh?

Oh, well....lessons learned. Lots of lessons learned in this one.

Next up: trying my hand at slabbing with a chainsaw....again.


Saturday, May 28, 2016

Measure Twice.....The End is HERE!!!!!

Yep! The end is HERE! The journey is over, but it ain't necessarily what you might think.

After having determined the other channeled log wouldn't work, it became necessary to find something else that would. Problem is most aspen trees don't grow big enough in diameter to meet the needs of this project. I probably already mentioned that in one of my previous posts. If I did, then my apologies. But it's true, dammit! Plus, the client wanted the bark to be left on which presents all kinds of obstacles of its own.

There are only two logs left in the inventory from Mark Guthrie, but there are also two problems with those logs that can't be overcome.

The first one is too small in diameter (see, told ya aspen don't generally grow big enough):


The second one is too split to begin with to be usable:


Bottom line? I don't have anything on hand that will work. Time to look in another direction.

A few years back, a friend of ours, Lorris Smith, my son Bobby, and I went over to Evergreen and harvested some aspen trees. Lorris saved some of those logs for me for a time I might need them for a project. I'd almost forgotten they were there, but lo and behold, Jodi was home and said there were several logs that were large enough to meet my needs.

Off to Lorris and Jodi's to get me some logs that I know...I just KNOW, will work!

Well, let me clarify that a bit....might work. That's right. Might work. The reason? Bark. Damn bark.

After having been outside in the elements for a few years, those logs did what came natural to them. They started drying out, and, as they did so, the bark started peeling. Only three of the logs in that pile came close to having at least some of their bark intact. The largest one had the best bark (farthest to the right in the photo below).


Home and unloaded in front of the shop:


Now all that remains is to decide which two out of three might work for what I still need to do. Truth is, none of them truly met the criteria. The largest one with the best intact bark would actually be problematic because I'll still need to find a couple of more logs about that same size. Otherwise, everything will be disproportionate, and that would simply not do! No sirree!

So, before I actually cut into that large log, I decided to try one more thing: take a hike! Well, at least take a hike that actually involves walking and look more deeply on our own property for something that might work. There are still about 20 acres that need to be thinned out for fire mitigation that I haven't really looked at very close for woodworking possibilities.

Luckily, our friends, Mike and Iris, asked me to watch their dog, Pagan, overnight. I love that dog. Plus, she's really big and really well trained to stay close. I think I'll take her on that hike I was contemplating. Yep! Hadn't done any hiking for quite some time because it just didn't feel all that comfortable not having a dog along....you know, the wildlife thing?

Anyway, way up in the hinterland corner of our property, I found what I was looking for --- three dead aspen trees that might work, one of which was already down. Is my luck about to change?

Nope. The next day, I drove to the meadow as near to the site as I could get (Pagan went home -- imagine my sad face here), and began cutting into the trees. The results were more than disappointing as you can see in the photo below. I even contemplated trying to use one of the rotten core trees by hogging out the core with the chainsaw, cutting the "slit" on one side, and finally leveling the bottom of the cut, but, alas and alack! The core was too off center, plus there simply wasn't enough "good" wood around the outside to allow me to do this and have confidence it would be structurally sound enough to wrap that I-beam.


Guess I'll be forced to use the biggest of the logs from over at Jodi and Lorris's after all, disproportionate or not.

Setting it up on the router planer:


Clamping it so it wouldn't wobble or roll during planing:


 Making some sawdust....actually, making a LOT of sawdust!!!


Taking it down to where it needs to be, and looking good so far!


Setting up to cut off the ends so they're perpendicular to the planed surface. Yeah, that's a handsaw on top. Trying to set it up to slice it off with a chopsaw didn't work the last time, and I'm pretty sure wouldn't work this time either. The only other option available was to do it by hand. Not optimal, but certainly realistic.


Y'know, even though this log has been drying out for what seems like forever, the damn thing is still wet enough in the core to close that kerf as the cut was being made. What to do? What to do? The only thing I could think of was to put a spacer, in this case a large flathead screwdriver, in the gap to keep it pried open enough to allow the back and forth movement necessary for the saw to keep cutting.

Almost through:


 Now for the other end:


And it only took 45 minutes to lop off both ends. I'm either out of shape, or I'm getting too old for this s**t! Lots of breaks while sawing to catch my breath, so I'm thinking it might be a combination of the two.

Draw out the lines marking where the channel will be cut, and use the angle grinder to cut chainsaw guides:


Looking good....or so I thought:


Two things happened here that helped determine my next move:

1. I hit a soft spot in the wood, and before I could pull back on the chainsaw, the blade went all the way through. Yep! The wood looked (and even felt) solid, but on the outside of the log that wasn't part of the planing some rot had set in that I couldn't see under the bark. That's grass on the ground you see in the gap in the photo. Damn, damn, damn!


2. The log split at the perpendicular rendering this log useless (along with the hole created when the chainsaw went all the way through) for this application. More damns, damns, damns!!!!


I QUIT!!! The end is HERE!

That's right. This job got the better of me. I'm going to call the client early next week and return his downpayment.

Lessons learned, and there are a few, include:

* Trust your gut feeling first and foremost. My gut told me channeling these logs might be problematic. It was. I should have insisted on going with my own suggested method which was to mill every single log right down the center and seamed them after notching to clad the I-beam.

* Avoid using aspen for this kind of application. It doesn't grow big enough in diameter, and even after years drying out is still too wet to prevent it from splitting and warping during preparation. That wetness is also a pre-cursor to rotting from the inside out. Not a good thing for sure.

* Make sure all, and I do mean ALL, logs are already on hand before beginning any part of the project. I didn't factor into the bid the possibility the trees the client had on his property might not work. As a result, I spent an inordinate amount of time and effort tracking down something that would work (and virtually none of it did anyway) before ultimately deciding to pull the damn plug.

And there you have it. Bruised ego? Yup! Shaken confidence? Oh, yeah! Embarrassed? Just a tad.

But, the end is HERE!!!! On to other things.


Measure Twice.....Part 5: The End is Near

In the last post, at the very end, the question was asked as to what's up next? The answer was "Fixing my other mistakes". I tried. No, seriously! I tried....very hard. The harder I tried, the more frustrated I got.

The first piece up for fixing was relatively easy. Since I cut the longest piece too short, it was a simple matter to cut a section out of that one that would be long enough to replace the other one I'd cut too short. Make sense?


The one with the channel cut in was an entirely different matter altogether.

At the client's home, it appeared the slot hadn't been cut wide enough. Upon further review once I got it home again, it became clear the cut was plenty wide, but because the log was still wet in the core, once that open slot had been cut almost all the way down through the log, the two "sides" started closing in on each other.

Scrambling around the shop looking for scraps I could shim in between the two side that would do so without going too wide apart, I came up with a solution as seen in the photo below.


Even with this solution, I had to use a great deal of care not to force them in too quickly or too forcefully for fear of cracking those sides along the bottom of the cuts.


What's more, the bottom of the cut still needed additional hogging out to make them as square as possible, and one of the sides had to be planed down with the router planer to accommodate a lower ceiling on one side of the I-beam than the other. So, smaller spacers were inserted to the proper length of 3 5/16" to keep them apart as long as necessary to be able to plane down the lower side.


Okay, those smaller spacers weren't gonna work while the chainsaw was in use to hog out the bottom of the cut because they kept falling down into the cut as I was using the chainsaw. The danger of that became immediately apparent as the chainsaw grabbed one of them and threw it by my head too close for comfort (yes, I was wearing my helmet with face mask on). So, some scrap 2x4s were inserted and tilted as necessary to get them out of the way while doing the hogging.

DAMN, but this is getting way more complicated than I wanted it to be!!


Once the bottom of the cut was hogged out to the proper depth of 6 1/2", the next step was to mark how much had to come off the top of just one of the sides.


That was easy enough, but setting up the log on the router planer so it would be level and even lengthwise and sidewise was a real challenge until I remembered the clamp and end blocks method to hold it steady enough to adjust it in small increments until level.


Routing if off down to the correct depth was pretty easy, all things considered. The sides are still a concern because the pressure being placed on the 90 degree cut at the bottom is huge, and the sides definitely want to close in on each other if I even think about removing those spacers.

I'm definitely NOT happy with progress on this project thus far! Seems like every one step forward results in two, or more, steps backward.

I keep telling myself the end is near, the end is near, the end is near. Every time I do that, the end seems to get farther and farther away.

Next up? Trying to find more logs that might work because this one ain't gonna be structurally sound enough to work, and the other one that still ain't even in my workshop yet hasn't been located out in the forest yet either.

The end is near, the end is near, the end is near......