Thursday, September 27, 2012

"Kraken"

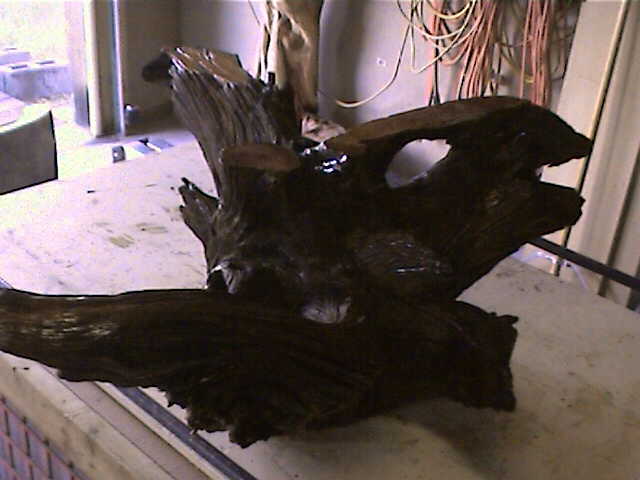
This is a very slow project. A long time ago, a tree root system jumped out at me and begged to become a functional art sculpture.


This piece, with its "tentacles" going off in all directions, reminded me of the "Kraken" from Pirates of the Caribbean, and that's how it got its name.

It sat in the shop for a long time after getting cleaned up. Today, I applied the first coat of gloss spar varnish. Bout' knocked my socks off! The color darkened considerably, and just popped!


Sorry about the photo quality. I'm learning how to use a different camera, and need to adjust the quality for indoor/outdoor conditions.

"Kraken" was so dry, it soaked up almost 1/2 quart of the spar varnish. Guess that'll give me an excuse to run to Ace Hardware tomorrow and do some window shopping along with the varnish purchase.

Wednesday, September 26, 2012

Please, PLEEEEEEEASE, remind me to never again.....

Can't remember if I posted photos of the root system I recovered from a Douglas Fir tree that was too close to my shop for comfort. This system looked like a tabletop in the making, so I decided to dig around the root and pull the tree over instead of cutting it off at ground level. It took a major effort to do that, plus a bunch of neighbors and friends to get in on the felling when it took place (sorry, no photos of that feat of ingenuity). Using some chains and a "come-along" winch, we were finally able to drop the tree over in exactly the spot we wanted.

That was three summers ago. Here's the system aged and ready for cutting.


After scraping off as much dirt as possible, I worked on removing as much bark as possible, too. This is the result.


Ya just never know what you're gonna find inside something like this, though. After making my initial cut in which everything went according to plan, the going got a lot tougher. The chain started smoking like crazy, so I thought I'd dulled it to the point it would need sharpening. Off to the shop I went.

Came back the next day, and began the rest of the cuts, and the same durn thing happened. Couldn't believe how much smoke that chainsaw was making. I thought for a second the wood in the root was catching on fire. Katherine was watching from the house, and she even mentioned how much smoke that thing was putting out.

Well, after getting all the way through on just one cut, I found out the reason why it was smoking as much as it was. See those dark spots in the center of the wood slabs? Those are a mixture of resin from the tree and dirt that had grown up inside the heartwood. Shoulda known. I think I mighta ruined a chain by going through this concoction, and could have ruined the chainsaw if I'd kept going at it any longer than I did. I'll still be able to use the one center slab for a tabletop if I dig out the resin/dirt combo and fill the void with something else.


This one gets filed in the "lessons learned" department.

Monday, September 24, 2012

Wood Gloat - Part 2

Finally got around to slabbing some logs into "cookies" in preparation for them becoming something or other. Was given these pieces over a period of time, and decided they needed to be out of the weather or they'd go bad. These are the results.

This first photo is of Green Ash. Very, very heavy, and I've never seen heartwood like this in any kind of Ash.


This photo is of Honey Locust (or so I'm told). Some really nice grain in these pieces, but very stinky to work with.


And, finally, some Douglas Fir. These are smaller rounds, but should turn out really nice in a project.


So, does anyone have any ideas on what these should ultimately become? I'm thinking of clocks or maybe even jointing them together and making tabletops.

Would you leave the bark on, or take it off?

Gonna have some fun with these!

Wood Gloat, Part I

Went to a neighbor's bi-annual party this Saturday, and one of the boys asked me if I wanted a hunk of wood. Thought to myself he must have picked something up on their property and though it might be cool. Told him I'd look at it to see if it might be usable. We walked to his truck, and there in the back was this slab that is just screaming to be made into some kind of a tabletop.


Basically, all this one needs is a good sanding, some TLC in some spots that have been filled in with something (not sure what it is), and, voila - a tabletop. This thing is between 4' and 5' long and has some beautiful grain.

Katherine says she wants in on this one. I agree.

Friday, September 21, 2012

Handy dandy "little log" slabbing jig

Thought I'd share this for anyone out there having trouble figuring out how to slab smaller logs. This little jig works great for me. This time the log was heavy enough and stable enough just positioning it right that I didn't have to secure it any more with screws into the ends. Bracing and chucking were enough.

The log is walnut somewhere between 2' and 2 1/2' long, and I'm thinking eventually it might become a bowl.


 Using my 20" bar on the chainsaw meant I'd need to go down through the log from one side, and finish the cut from the other side.


On this log, I decided to lop off a "top" and a "bottom" in order to perhaps make a bowl out of it later.


And, after I was done with the walnut log, I still had enough poop and vinegar left to slab a smallish cottonwood log I had in the shop, too. Not sure what these will eventually become. Ideas, anyone?


Thursday, September 20, 2012

Got frustrated - tried something new.....

Awhile back, I posted about some coasters I'd been making with Aspen leaves. Tried all different stages in the season for the leaves, but, without fail, somewhere between 2/3 and 3/4 of them turned out to be useless for me. They'd dry and either curl up or turn brown:


 No matter what the method, they weren't about to cooperate. So, decided to spray paint them instead. Decided to try copper and gold as colors. Turned out really nice. The paint dries fast and, so far, seems to be holding the shape of the leaf intact.

The photo below shows five of them "curing" with one coat of epoxy (just did these today). Four are mounted on pine "cookies", and one is mounted on a juniper "cookie". The green one in the photo was one I'd done earlier that turned out ok after one coat of epoxy. but one little dimple was left above the surface, so now it is undergoing coat number two. Will also need to give each of the others another coat, as well. Unless I actually route out a leaf shape and put them down into the depression, these leaves never lie completely flat even after pressing them between the pages of books for awhile.


This last photo is of some aspen leaves that were painted a metallic red. Waiting for them to cure, and to see if they'll be usable, too.


Just trying what I hope will be some interesting variations.

Sunday, September 16, 2012

Angle Grinder "Carving"

Next step in practicing making a bowl (maybe even ruining it) is to rough grind it down to the approximate shape I'd like. To do this, I used my angle grinder with a mini-chainsaw wheel attachment:


For fast stock removal, I haven't seen or used anything quite like this. The only problem, if you want to call it that, is that it's very aggressive. Much smaller than a chainsaw, but just as much danger (more so if you aren't careful at ALL times). Kickback is still a possibility, and that's why I wear chainsaw chaps, kevlar gloves, and both ear and eye protection. Chips and sawdust fly in every which direction (especially if the wind is blowing). Anyway, here's a short video of me starting on one of the bottom ends of the block:


Lesson learned: Don't use the grinder for all the rough stock removal. Took me six hours to get the approximate rough shape I wanted. On the next one, I'll try to "cone" the block using a chainsaw first. That way, I won't have such a tired old decrepit body by day's end.

A few photos of the work in progress:

In this one, I've already done two sides and an end. Still not tired enough to stop for the day.


 In this one, you can see the "outline" of the pattern I wanted for the top of the bowl. Did this with a Sharpie.

This one shows the "indent" where the scallop is going to be.

And this one, durn burn it, shows a crack that opened as I was working on this side of the bowl.

Guess you never know what you're going to grind into once you get started on something. This last photo shows the exposure after I broke off the cracked piece. My plan is to actually make the base a little smaller than originally intended. Hope the balance is ok if I do that. Won't know until it's done. If it doesn't balance, I may have to make a base for the bowl, although I don't really want to do that cuz I believe it'll detract from the overall appearance of the piece. We'll see, I guess.