Sunday, December 27, 2020

Quit Hogging Those Bowls.....

I've often wondered why woodworkers who do this kind of work call carving out a bowl "hogging"? Seriously, can anyone answer that question? Anyone?

But I digress....

Today began the process of hogging out the actual bowl depth on those blanks from the previous post.

The tool used in this process is an angle grinder with a handy-dandy ArborTech Turbo Mini-Planer attached. 


While this tool doesn't remove stock as fast or as aggressively as that carving disc I talked about yesterday, there's really nothing like it to be able to get down into these bowls like this tool does.

In order to hold the slab stable while carving, that work table in the photo above had to be used because the weather today didn't cooperate like it did yesterday. So, there was no outside work to be done.

Inside work is ok, but it sure does make a sawdust mess all over the shop! No dust collection system works very well either because the planer on this angle grinder tends to throw shavings (not dust) all over and in every direction. That push broom is 30 inches wide to give a little perspective.


Oh, well....just need to devote more time to clean-up at the end of the day.

The work table is basically a trough with two 4x6 inch planks placed against the outside edges of the table on the inside of those edges. That leaves an open area in the middle that most pieces fit down into. If their shape is too irregular, they can be weighted with different heavy metal pieces (axe head in the photo, for example) to hold them steady while I'm working.

After about one hour and hands going numb from vibration and tight gripping of the angle grinder, one bowl is 'hogged' out and kinda sorta shaped in preparation for fine tuning and tweaking everything:


Another hour and the second bowl suffered the same fate:


This is why I love working with juniper. The pieces are like a box of chocolates (to coin a phrase from Forrest Gump)....you never know what the red heartwood will look like until you get down into it. I'd say these two pieces are a score!!

Taking a break to feed my face and rest up a bit for hogging out the biggest slab (looks like an aircraft carrier without the conning tower). 


That one's going to take a bit longer to do because it's so much bigger than the other two.

Wish me luck!!!

BREAK'S OVER!!!!!! GET BACK TO WORK, YOU SLACKER!!!!!

Back at it....

Large bowls like this one take longer to hog out because of their size.....DUH! But, the red heartwood getting exposed is a trip in and of itself, and this bowl didn't disappoint, for sure. 


I should have quit for the day at this point, but I just couldn't resist going the next step on this bigger bowl.....fine grinding and sanding. In order to do that, the turbo mini-planer had to be changed out, and a 4 1/2 inch Kutzall grinding disc/wheel put on the angle grinder. 


From there, it was a matter of smoothing every single surface of the bowl as much as possible. I also found out this wheel is really good for getting into nooks and crannies without destroying the piece.


I think this bowl is gonna be a winner!!

This stage in the process is always so gratifying because this is the point where they begin to look like they should and the work put into making them seems so worthwhile.

It's supposed to be colder, windier, and snowier tomorrow than it was today. So, it looks like another inside Ted's Shed work day. 

DWR


Saturday, December 26, 2020

Carving and Shaping Begins.....

What an absolutely gorgeous day today! Warm temps, little to no breeze, sunny skies. It really doesn't get any better than this to make some serious sawdust, especially outside!

After cutting three bowl blanks from the juniper log featured in my last post, the work of carving and shaping began. 

The tool I use to get the bark off (usually juniper bark falls off after being exposed to the elements for a time....this bark was still attached) is my angle grinder with a very aggressive carving and shaping disc tool. I don't really care for this carving and shaping disc tool because it is too aggressive for my liking. The carbide teeth grab and pull if the user isn't super vigilant, and vibration is a real issue when it comes to physical fatigue using it. When it wears out, my next one will have more than the three teeth seen in the photo for sure!

Setup for doing this kind of work is a snap with the two logs on top of some pallets I now use to semi secure the log blank I'm working on. Someone somewhere suggested using sandbags for this purpose, but I'm finding debarked logs work very well, too, and that's what I went with.

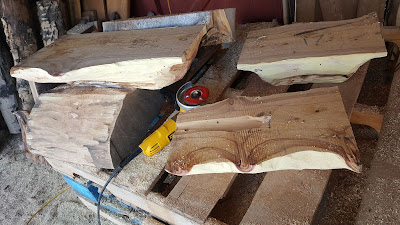
Once the bark was removed, some of the yellow sapwood also had to be ground off. The photo below shows all three bowl blanks with almost all the bark removed along with some of the sapwood. The ends getting ground down to a rough shape was also part of this process.


Flipping them over revealed the bottoms needed to be planed down at least another inch in order for the bowls to be stable and not tip over while in use. That step happens this afternoon....I'm on break for a bit!


Break time is OVER! 

I originally thought taking off one inch, or so, would do it, but ended up taking off almost two inches in order to get them as stable as they need to be.


I've said it before, and I'll say it again.....the router planer in the photo above is one of the best tools in my shop, especially for working on irregular shape pieces. 

In this instance, though, I was lucky because the slab was flat on the side that's eventually going to get hogged out (bandsaw sawmill). That made securing the piece really easy.

So, in order to secure the piece, I used deck screws through a scrap 2x6 I had laying around. First, I secured the 2x6 to the piece on the part that will eventually get hogged out with one screw. That way, it didn't matter if there was a hole from the screw because that would get carved out anyway. The 2x6 was then secured to the work surface with two screws, one on each end of the 2x6. The piece was now nice and secure.

From there, it was a matter of taking off as much as needed to make the piece sit solid on a flat surface when done (the one on the left in the photo below).


To get a similar height on the next piece, all I did was place that piece (the one on the right in the photo above) to be done upside down next to the completed piece, and scribe a mark at about the same height that will be the limit to how much I'll take off with the router planer.

From there, I did the same thing with the third, and largest, piece, and now I have three bowl blanks that I'll be hogging out tomorrow, weather and my own physical aches and pains permitting.


Methinks these are gonna be some really nice bowls!!!

DWR

Thursday, December 24, 2020

Decisions....Decisions....Decisions

There are times I just want to slap myself up alongside my head and quit being so indecisive about some of this stuff.

The slab discussed in the previous post is just under 60 inches long. The question that bugs me is how many bowls can I get from it?


If it's 60 inches long, that means I can make four bowls that are 15 inches long. Or I can make three bowls that are 20 inches long. 

Too anal? Yup.....

I needed to think outside my own restrictive 'box', and just ask ask Katherine what she thinks.

Thank goodness I did.

Her idea was to make one bowl 24 inches long. That leaves a slab 36 inches long. If that slab is divided by two, VOILA....there will be two more bowls that are each 18 inches long.

Or so I thought.

Not to worry, though. The chainsaw kerf will shorten the bowl slabs just a tad, so each of the bowls will be slightly less than the measurements cited above.


But the end result will still be pretty much the same.

Next step is to mark the slab:


That wasn't too difficult....especially since the measurements don't require perfection.

Next step involved setting the slab up so the chainsaw blade wouldn't go into the snow. Luckily, I made a simple sawbuck a loooooong time ago that works perfectly for stuff like this:


And the final step was to actually make two cuts to get a total of three bowl blanks/slabs:


Now comes the fun part....carving and shaping. That's gonna have to wait awhile until it warms up a bit, hopefully later this afternoon.

Only time will tell, but I think these bowls are going to turn out really nice.

DWR

Tuesday, December 22, 2020

It's Been a Looooooong Time Since My Last Post....

 2017.....that's how long it's been since I my last blog post. Should I be embarrassed? Naw! I've been posting on Facebook instead.

This project, however, requires a blog post. 

Why, you ask?

Because it's the start of a series of posts in which juniper bowls are being created from a previous project that kind of went bust (more on that later).

Anyway, in May, 2016 Scott Shaeffer was kind enough to mill a juniper log for me. The thinking was that the center cut would make a beautiful fireplace mantle for some friends of mine. 

Choosing the log was the easy part especially since Scott had the forklift needed to pick it up and place it on the sawmill without having to heft it ourselves.


This was a very straight juniper log....something one does not usually see in juniper.


The reddish/purplish heartwood was amazing!

This is where the "later" thing I mentioned earlier comes into play....reality is this was a green log, and it warped. I had to cut it into four pieces and hope it could be salvaged!

But that's really not the subject of this blog post, though. The excess cuts around it are! 

Scott, in his magnanimous generosity, told me I could have the excess he'd trimmed off at no charge. Of course I jumped at that offer, and those pieces are the subject of this blog post.

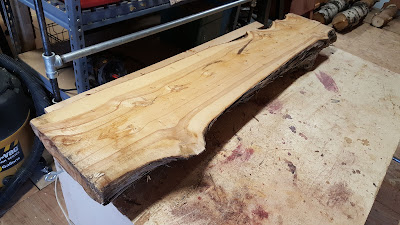
When it comes to creating bowls from rough slabs, rounds, and/or cuts of wood, one must consider how deep the bowls need to be, how wide they need to be, and how long they need to be. One of the slabs Scott let me have is 5 feet long.


What appears to be the 'bottom' of this slab (the side that's flat on the table) in this photo made stationing the piece easy. It just had to be stabilized so it wouldn't slide as it was being planed with my router planer sled. Here's a photo of the slab 'right side up':


It was also longer than my router planer table, so I used a piece of masonite to accommodate the extra length in order to move it as needed as planing progressed. One side of the masonite was smooth allowing me to move it as needed on the table. The other side was 'rough' which prevented the slab from sliding and causing some pretty nasty gouges from the router.

Setting up the planer to take off the least amount possible took some time, but eventually I was ready to rock and roll!

After I don't know how many passes of taking off around 1/2 inch of sapwood on each pass, I decided to stop for the day.


Tomorrow, weather permitting (it's supposed to get cold.....REALLY COLD), I'll use the chainsaw to slice this 5 foot slab into smaller blanks that will become bowls. 

GAWD, I love working with juniper!!!

DWR

Saturday, October 28, 2017

Fireplace Mantel --- There Shall Be Tweaking Going On


Well, with this post, the blog is finally caught up with the project.

The project ain't done....not by a long shot. But the motivation to write was stronger than the reality that my back would be made worse than it already is if I even tried to lift one of these stumps, much less keep trying to re-position them as needed.

In fact, it could be quite awhile before there's another post in this series if this back doesn't get a whole lot better....soon!

Add to this that several more projects are either in the works, or need to be in the works, that haven't been completed or even begun for that matter, and frustrating doesn't begin to describe how I'm feeling right now!

Enough with the pity party.

Get to writing!

So, this post is dedicated to tweaking the shapes of the stumps to help them flow into each other where they're joined together even though they haven't actually had the glue or the screws applied just yet. More on this in the next post....whenever that may be. DAMN...gotta stop the pity partying!!!

Before the tweaking could begin, however, something that had been bothering me for quite some time finally had to be addressed before going any further.

One of the stumps (photo below) had a hole all the way through. That hole was filled with dirt and rotted material from the core heartwood of the tree it came from. To leave that dirt and rot alone and seal it into the finished product simply was not going to work. Nope! Not even a little bit!

Cleaning out as much as could be reached by hand and with the long neck die grinder took the amount to be cleaned out down a bit, but there was still a bunch that just couldn't be reached:


Enter the power washer.

I've never been a big fan of power washing these kinds of wood pieces because I end up soaked from head to toe and full of mud and debris from the piece, as well. Call me a glutton for punishment, but there will be no full body protective gear for me. Too bulky, and too cumbersome!

The irregular shapes of each piece make power washing all that more difficult....all it takes in one little nook or cranny, and shaZAM...the body soaking begins! If the weather is warm, it's not as bad as it could be, but it's bad enough!

Setting up was simple. A pallet to set the piece on while washing helped with minimizing splashback and creating too much of a mud bath. It didn't eliminate them, but getting the stump off the ground even a little bit helped immensely! The oscillating nozzle on the washer also helped shorten the time spent cleaning it out:


The end result was a complete clean-out:


With that part of the project finally out of the way, the real tweaking could begin.

The overhang or overlap, as it were, had to be removed:


The way to do that involved rough scribing a portion of stock for removal. Magic markers sure do come in handy for this sort of thing. Positioning for best fit didn't hurt either:


Once again, that handy dandy Stihl 440 Magnum earned its keep! A sharp chain also helped: 


This saw served me well for many years, but being the old guy I'm getting to be, the weight of this chainsaw convinced me to sell it and buy something a whole lot smaller. Another story for another blog post, eh?

Once the marked stock had been rough removed, it was time to see how things lined up.

First column:


Second column:


Both columns:


Looking pretty darn good if I do say so myself.

And that's as far as this project has gone as far as shaping is concerned. The joining will be done as soon as practicable and as soon as a healed back allows.

In the meantime, choosing a stain for the columns is the next step:


Which one do all y'all fancy?


Friday, October 27, 2017

Fireplace Mantel --- The Concept


Well, given my back is still giving me a whole lot more trouble than I thought it would be giving me after all this time, what better task for me than to put in writing more of the progress that's been made on this project?

A couple of blog posts ago, in Peeling Me Some Pine Stumps, the stumps chosen to make up the columns for this project actually started to look like they might work. The only thing is, the pieces to that puzzle hadn't yet been set up to actually be the columns in more finished form.

Conceptually speaking, I'd set them up in very rough form:


But, that set up wasn't truly representative of what they should come close to looking like in finished form. That's what today's blog post is ultimately intended to show.

Anyway, the first step in the process was to mix and match all four stumps for best "fit" with each other (see previous blog post mentioned above) to determine which two would go on top and which two would constitute the bottom of each column.

After two top pieces and two bottom pieces were chosen, the bottom pieces were set aside to work on later.

The two top pieces were set and fit as close to each other as possible, and were then eyeballed to see how much would need to be removed in order to get to an identical flat surface on both stumps:


Keeping in mind that a minimum of stock removal was critical for this to work since there wasn't a lot of extra to play with, both stumps were shimmed to accommodate that requirement (see photo below showing one of them with shim in place) all the while eyeballing and re-positioning frequently and as necessary for best alignment.

DANG, but those things are HEAVY!

Because they are so heavy, securing them to the router planer table wasn't necessary to prevent movement back and forth. However, shims were necessary to keep them stable enough so they wouldn't wobble when the router passed over.

Yep! Should work:


Measure twice....rout once! Learned that adage the hard way far too many times to remember.

Just right! There's just enough to allow for about 1/2" of stock removal to get both stumps down to the necessary height for the top two stumps on this pass: 


Once the ends of these two stumps have been planed down, it's a simple matter to just flip them over and do the other ends the very same way. Then it'll be on to the bottom two stumps to do the same thing with them all over again.

Let the router planing begin!

But wait!

I know I'm tall, but I ain't THAT tall!

The router planer table height combined with the stump height was just too high for me, even as tall as I am, to comfortably reach while standing on the floor. So, it became necessary to rig a jig (see what I did there?) to give me a few more inches in height.

Good thing I had some scrap lumber and car ramps sitting around! The little bit of time it took to come up with a raised platform to stand on was well worth it. It actually added about 12 inches to my height....while standing on the platform, of course:


After all four stumps were routed down to height, the true test was in whether the two columns were now the same height. So, hefting those lightweights (just kidding) up on each other, this is how they look now:


And, the good news is the two columns are exactly the same height, and that height is exactly what is needed to fit on the hearth they'll eventually be mounted on:


And, just to make sure I measured right, and to give a better idea what these columns will ultimately look like with mantel slab in place, I set a flat 48 inch slab from my scrap pile on top of the columns. The actual mantel slab is 9 feet long. The final placement of the columns on the hearth will be farther apart on either side of the firebox opening than shown here just to give some perspective.

Now THAT's kickin' some serious fireplace mantel butt:


I gotta tell ya, being these stumps are so big and so cumbersome, there was an ever so slight amount of trepidation on my part that this idea, this concept, wasn't going to work, and that I'd have to go in another direction completely if they didn't.

Truth be known, there's still a bit of trepidation, though, because four stumps must now become two by joining together the uppers to the lowers, and we're not talking about false teeth here, either.

I'm thinking wood glue between the upper and lower stumps should be a good way to attach them to each other, but, just to make absolutely sure they won't come apart, I plan to use Timberlock lag screws, as well.

Holes will be drilled diagonally from top stumps into bottom stumps to accommodate the screws. Of course, the holes drilled to accommodate the screws will also need to have plugs to fill them in, but this should work, right?

Time will tell.....

Stay tuned!