Thursday, August 29, 2013

Television Stand - Part Deux...

Well, doggone it....finally decided to dedicate more time to this project and git er done! Figured I needed to be able to hog off some of the router marks left in the slabs after planing, and bought this heavy duty, magnesium 4"x24" belt sander from Harbor Freight. Suffice to say, it works (2nd photo).


Some of the gouges were also from my chainsaw. Those were a little hairier to get out, and the sander got shelved for that process. Instead, I used a 4 1/2" cup rasp wheel, also from Harbor Freight, that I was pretty impressed with (see previous post of my tool review on this product.

Anyway, I roughed each slab as flat as my eye could see - eyeballing isn't something I'm really too good at, but it got the job done.....Oooh, my aching back!

This is a lot harder than I thought it would be. I had to keep raising the slab up so my 6'4" frame wouldn't have to keep bending over so far. Even at that, the reach across the piece was far enough that the main pressure point was right square in the middle of my low back, and now I'm sitting here typing with a heat pack on and thinking about pouring a nice tall glass of wine to help drown my sorrows and to numb the pain.

The next step was a little more complicated. A lot of the finished appeal of a piece like this is in the actual arrangement of the separate components. Everyone has their own ideas on how things should ultimately look, and I knew what I thought was right might not be the same thing as what Katherine thought. So, I asked her to come on up to the shop and take a look-see and provide some feedback.

Before she came up, though, I "arranged" the components how I thought they might look best:


Try to imagine the pieces in this photo without the concrete blocks in between the shelves and with the shelves attached to the two end columns. I thought that would be pretty appealing.

Katherine took one look and told me to get the column on the right out of there. Then she turned the other column piece completely upside down to try to take advantage of the twist in this piece of juniper.


I know the lighting isn't too good on the first photo above, but hopefully you get the idea.

The shelves will look almost like they are suspended when attached. I'll be cutting the top part of the anchor column off and leveling it to accommodate the lower shelf that'll be home to the electronic components like DVD player and sound bar. That's a whole nother process for the next blog post on this project.

Getting the bottom of the anchor post flat was achieved by using the angle grinder with the cup rasp wheel. Took awhile, again, simply because my eyeballing skills need to be honed a whole lot more before I'll consider them to be even close to kind of good.


This piece is so heavy, all I had to do to stabilize it while grinding was to lean it up against my sawhorses. It didn't move at all!

The end result (I still have a little more work to do on the bottom to get the angle it sits at just right, but I'm getting pretty close) should be a very stable, anchor column for the two very heavy shelves.

The lower shelf will be about where you see the branch sticking out from the trunk about 2/3 of the way up in the photo below, and the top shelf just attached to the spacer column in between the two shelves (pictures to come in the next blog post).

I sure do hope my idea is a good one when this all gets put together. Balance and stability are key elements, and I'm just not sure yet whether I have both in what I'm doing so far. Guess the proof will be in the pudding as a wise old man (my Dad) once told me.


Wednesday, August 28, 2013

Tool Review - 4 1/2" Carbide Cup Wheel (Harbor Freight)

If I only had the money, I'd buy a Lancelot "Holey Galahad", but I don't have the money. Went to Harbor Freight and found this kind of a sort of a "knock-off".

To be honest, I was really, really skeptical how this would work. The first time I tried it was on some end grain cottonwood, and I thought "oh, crap, this was a waste of money". After all, cottonwood is soft and should be really easy to hog off. But then I figured what the heck....I'll try it for hogging off some of the chainsaw marks left when I slabbed some walnut, and was actually pretty impressed. End grain removal, even on cottonwood, mustn't be it's strong suit. With the grain, though, is something else altogether.

As you can see from the photo below, it definitely leaves marks in the wood which is to be expected given this is a very coarse grit of 24.


As a knock-off, I'd rate this product an 8 out of 10 with 10 being the highest. I've seen some videos of the "Holey Galahad" in action, and this one doesn't come close to the same amount of sawdust being made, but, for the work I do, this is good enough.

Plus, the price is right at a modest $9.99. I can go through a lot of these before I get to the price of a "Holy Galahad" at $79 each. That makes this product even more attractive from my perspective. Might take a bit more to "finish" grind the surface (essentially two more steps using router planer and belt sander, and another step for finish sanding) because of the relatively deep gouges made by the grinding wheel, but not all THAT much.

I even used this grinding wheel to take down a surface on a pedestal I'm working on that'll ultimately wind up being a television stand (looks kind of off kilter in the photo, but is actually pretty level all things considered):

I'll ultimately wind up using my router planer on this surface, as well, and on the other end of it (upside down in this photo) so they are parallel to each other.

This grinding wheel is an in-store purchase only. If you'd like more specs on it, go to the Harbor Freight page here.

It doesn't say if it's to be used with wood or not, but I did it anyway, and I'll say I'm satisfied so far. Still don't know how long it'll last, but hopefully long enough to make it cost effective. Labor intensity I'd be rating at a 5 simply because I'm old!

Friday, August 16, 2013

Bench - MUST...MAKE...BENCH

Awhile back, I saw a post on a friend's Facebook page, Knock on Wood, that bout knocked my socks off! This guy does some simply amazing stuff, but this particular work of art inspired me to try the style myself:


My first thought was "I need a 3D printer". Problem is I doubt there's one big enough to handle a project like this, plus making it out of plastic isn't something that really appealed to me being a woodsy kind of guy, ya know.

So, I went to my raw materials pile, and this is what I came up with:


Mind you, this was a gnarly old Ponderosa Pine that was fixin to fall over in the next windstorm because of pine beetle infestation, so we decided to take her down last year and let her dry and cure the old fashioned way - solar.

Went up to see how she was doing this morning, and decided to cut the main piece out of the tree itself.


That's a Stihl 440 Magnum with a 20" bar in front of the bench seat to help give a better perspective of the size of this thing.

The first photo is of the bench on its side cuz it kind of fell over after I cut it. The second is of it propped up temporarily using a couple of blanks I had laying around to support it. Man, that thing is still heavy. Wondering if one year is actually enough drying/curing time.

The last thing I looked at today (all this work really took the wind right outta my sails) was the rest of the tree and other raw materials that might work for some legs and a seat back. Ya'll gotta help me here and tell me which you think might work the best:


I'm kind of thinking maybe shaping the one in the photo to the left to contour to the shape and curve of the bench seat and the one in the photo on the right cut and shaped to support the seat from the back almost where the blank is positioned under the seat in the photo above to support it. Almost like a tripod kind of.

Time to go get Bobby and have him help me move this monster closer to the shop so I can get to work on it.

Wednesday, June 19, 2013

Television stand

Not sure why I'm taking so long to get this one done - mental block? Artistic block? Seems every time I feel the urge to continue, I go up to the shop and come right back down without doing much of anything. Figured maybe if I post some of the progress so far, it would get me motivated. We'll see.

This project started out with our daughter's TV stand I made for her for Christmas as its model. Katherine liked it so much, she decided she wanted one, too.


I do these things really, really slow because I’m old, don’t ya know. So step one was working up the energy to actually photograph the walnut log prior to marking it for slabbing. Man, those things are heavy!


Figuring out how to slab the log wasn't all that hard. Doing it was another story.

First, the log had to be marked. I used a laser line from a cheapo level I bought at Home Depot a long time ago. You can’t really see the red laser line in the photo, but it’s there.


The log is about 48” long and varies in diameter from 14” to maybe 30” at the widest point.

Then it had to be set upright on a sacrificial pallet. Used a dolly to transport (weighs in over 200 lbs, and I ain't a gonna even try lifting it), and got it upright on a pallet


Securing it with a tie down was simple. It was so heavy, I don't know if I even had to take this step, but better to be safe than sorry, right? 

Next step: Fine tune the chainsaw, eyeball the scribe marks, and make the cut as best I could. A friend on Lumberjocks.com told me he uses chains whose teeth are sharpened at 0 degrees in order to rip. Tried it, and lo and behold! It worked! A lot easier than using a regular crosscut blade, that's for sure!

Photo below shows one cut made pre-0 degrees sharpening.


Gonna need to learn how to do this better. Cut was just ok, not great. You can see where I missed the mark a coupla times, but will use the router planer later to take it down to flat.

Gave the 440 a workout, too – guess I’ll need to sharpen the chain after each cut because it was pretty dull by the time I got done with this one.

Heartwood felt a little damp to the touch (even though these logs have been on the ground for 3-4 years and I've had them for almost a year) after slabbing it. More drying necessary, I guess.

Cutting one slab was enough of a workout for this day. Hopefully will be able to get to the second one tomorrow. Goal is to get three nice 1 1/2” to 2” slabs from each of the two logs I have.


The rest was pretty simple - just keep on working from the outside inward until the last slab standing was the one secured by the ratchet tie down.

First cut using 0 degrees:


Second cut:


Some really nice grain:


The next step was trying to figure out how I’d secure the piece in order to make the last cut. It was too narrow to keep on using the tie-down, so I shimmied the thing around and hammered some impromptu chucks down on the flat sides of the piece to hold it steady (no photo, but I think we can use our imaginations, can't we).

Worked really well. The piece didn’t move at all, thank goodness. I’d have a lot of explaining to do to Katherine if I had had another accident with the chainsaw (put a 61 stitch cut across my left knee a few years back – no sympathy for stupidity, though, cuz it was my own dang fault).

The results of the last cut :


Two really good matching slabs out of this log. Might even be able to use them in a bookmatch configuration. Guess we'll have to see.  

Both these slabs also have a branch crotch in them. The grain pattern is incredible! This is some really fantastic wood I’m working with, and I can only hope to be able to score more of it in the future.


Next up: planing the slabs with my router planer.

Monday, November 5, 2012

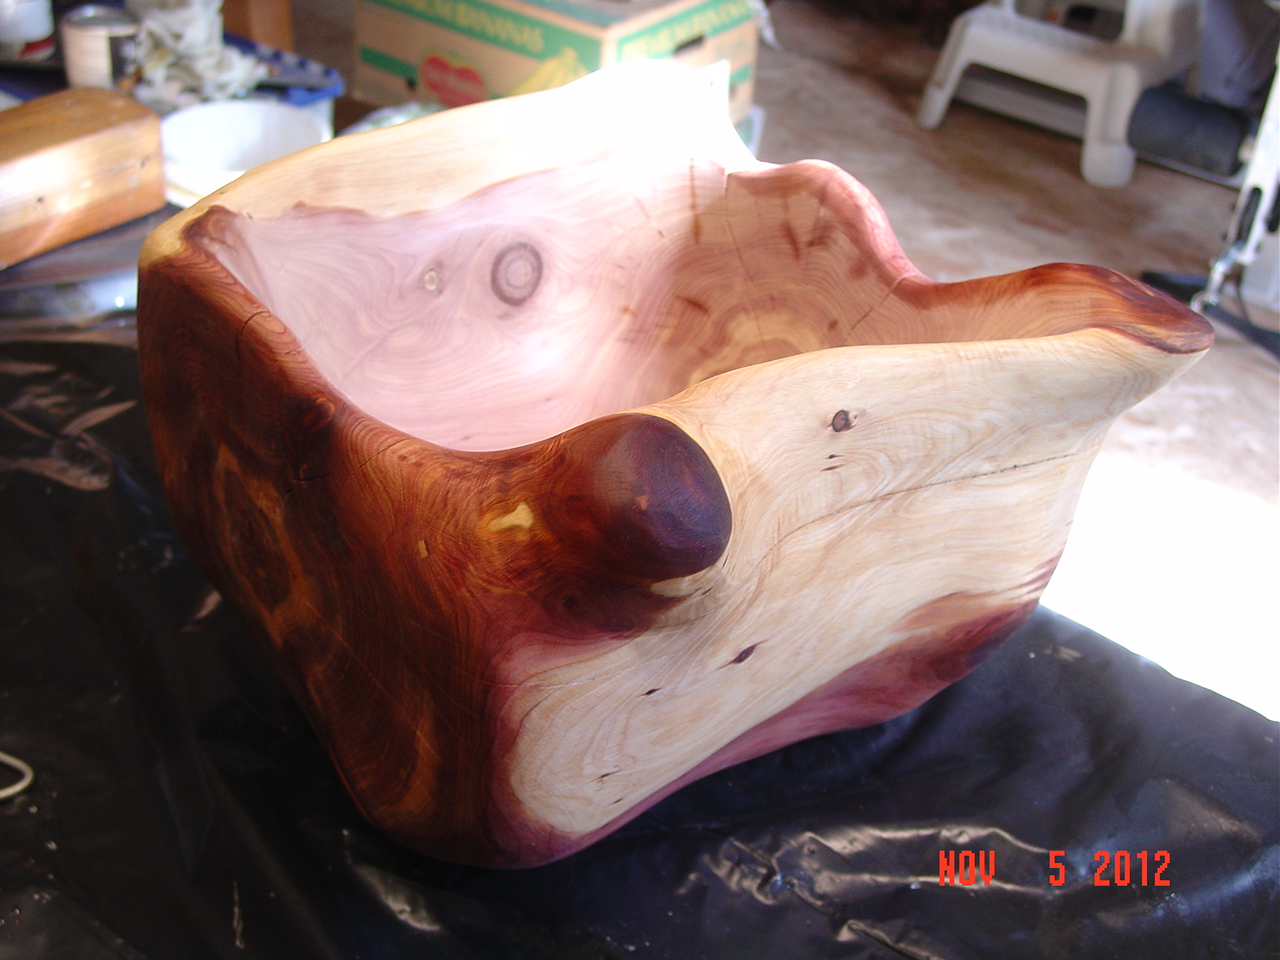
More BOWLS!

Decided to try my hand at carving some bowls using juniper. Results so far are very good. I'm trying really hard to emulate Scott Shangraw's bowls, but he's way more advanced than me. If I can get to be half as good at carving, shaping, sculpting, and finishing as he is, I'll be happy.


The bowl above has two coats of Watco Danish Oil "Natural" on the outside. The inside will be left "raw" so the aroma of the juniper can be enjoyed by all.


Plan to do a lot more carving on the last one. Also need to fill the voids, probably with turquoise and epoxy, but not 100% on that one.

BOWLS!

Awhile back, I posted a photo of a log. Not just any log, but a log received from a friend. Didn't quite know what to do with it at the time.


Well, the bug bit, and I cut the log into two pieces right down the middle. This log is said to be walnut, but after cutting into it, I'm not so sure. Doesn't really look like walnut, doesn't really smell like walnut. But the grain sure is pretty. Here's the two bowls I'm making:


Gonna have to make a base for the one above because it's just too tippy as is (a piece fell off as I was working the wood, and it affected the balance of the whole thing).


Shaping, grinding, sanding. Shaping, grinding, sanding. Could go on and on about the shaping, grinding, sanding but won't. This is a lot harder than I thought it would be, but certainly will be nice when done. I'll post on Facebook when they're finished.

Monday, October 15, 2012

Tweakin' my router planer


Found I had to tweak my bigger router planer a bit more in order for it to work as well as I wanted it to work. The slabs I’m doing right now were too long for the regular planer, so had to get out the really long rails once again.

Problem with the setup I had already used was the sled didn't ride the rails as nice or as easy as I’d hoped they would, even with using some wheels/casters as guides. Got some enclosed ball bearings for Christmas and decided to give those a try.


Had to add a spacer to accommodate the bearings so they’d ride on the inside of the rail. One obstacle out of the way, a couple more to go.


The next thing I decided to change was the fact nothing was really holding the rails in place except their own weight. Made for some pretty wishy washy planing. So decided to use the existing pipe stiles to get an even width on the rails.


Once all four of the pipe stiles were inserted and the rails were placed up alongside them, the width was even steven all the way along the 16’ length of the rails. But the pipe stiles stood proud of the rails by about 4 or 5 inches which wouldn't allow the sled to pass beyond their location. Next step was to either go buy shorter pipe stiles or figure out something else. Chose the latter. Took some big eye bolts and opened the eye to accommodate a 1/2” pipe. Put it into the side of the table, and dropped the pipe stile down into the opening so the “stub” held the rail from moving in toward the other rail.


Sorry the image is way fuzzy. Gettin’ so excited to use this thing, my hand musta moved as I snapped the picture. I’ll try to get another one for the next blog post to give a better idea of what I’m talking about.


Anyway, this last tweak worked great! Kept the rails from moving any at all, and the width between rails remained very constant. Ball bearings helped immensely, but need to make one that runs on top of the rails, too.


Couple more minor modifications, and it should be where I need it to be.